Content
Published: 7th December 2:44PM
The Drop: Welcome to Appalachia
The Black Ops 7 integration is finally here, and with it comes Haven’s Hollow, the misty, Appalachian Resurgence map that is already chewing up squads and spitting them out. It’s tighter than Rebirth Island, more vertical than Fortune’s Keep, and absolutely dripping with “pre-outbreak” lore.
If you want to survive the drop, you can’t just float aimlessly. We’ve broken down the map into meta-defining landing zones tailored to your playstyle. Whether you’re chasing high-kill PRs or sweating for the Nuke contract, here is exactly where you need to be.
1. The “Sweat Fest” (High Kills / High Risk)
For the movement kings and squads who want action immediately.
The Barn (Central Hub)
The undisputed “hot drop” of Season 1. Located dead center, the Barn (and the adjacent Chapel) offers the highest concentration of ground loot and immediate sightlines over the rest of the map.
- Why land here: If you control the Barn roof, you control the rotation. You can snipe players rotating from Mansion or Main Street.
- The Risk: 10/10. Expect at least 3 other teams. If you miss the roof landing, you’re dead.
- Pro Tip: Don’t linger on the ground floor. Grab an SMG and get to the rafters immediately.
Main Street (Liberty Falls Legacy)
Recognize this? It’s the pre-zombie version of Liberty Falls. This area is a CQB (Close Quarters Battle) nightmare filled with shops like the Bowling Alley and Video Store.
- Why land here: Dense cover makes it easy to outplay larger squads. Great for “breaking cameras” and aggressive SMG play.
- The Risk: Third-party central. The audio here is chaotic, so listen for footsteps carefully.
2. The “Power Position” (Tactical / Ranked Play)
For squads looking to stack cash, get loadout, and hold a power position for endgame.
The Mansion (North)
Situated on the northern high ground, the Mansion is a fortress. It features the famous “Richtofen” layout with a main hall and rooftop access via ascenders.
- The Play: Land on the roof, wipe the one team contesting you, and then hold the high ground. You have a clear view of the Pond and Research Center.
- Easter Egg Alert: Keep an ear out for the “Bell” on the second floor; interacting with it can drop bonus cash and plates.
Research Center (Northeast)
A three-level structure that rivals the Control Center from Rebirth Island.
- The Play: Land top floor. The loot density here is absurd—you will leave with a full loadout within 60 seconds.
- Rotation: From here, you have a natural rotation down to the Coal Depot or push across the bridge to the Mansion.
3. The “Regain” & Easter Egg Spots (Solo / Safe)
Bad drop? Need to regain? Or just want free perks? Go here.
The Waterfall Cave (Secret Loot)
Located at the very top of the map behind the massive waterfall.
- The Secret: You have to fly through the waterfall to enter. Inside, you’ll often find a Buried Treasure Map or high-tier chests. It’s the safest regain spot because most players forget it exists.
- Reward: Solving the treasure map often grants a free Loadout Drop marker or Specialist Perk.
Riverboat (South)
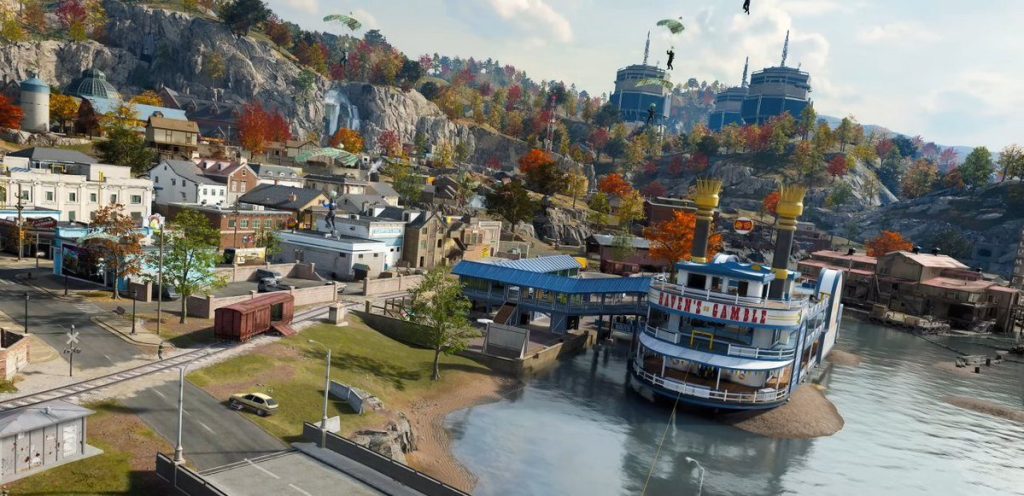
The “Haven’s Gamble” paddleboat is isolated at the southern edge.
- Why land here: It has its own Buy Station and is rarely contested by more than one solo.
- The “Win Zone”: Check the bottom deck for the Slot Machine. Spin it for $500—if you hit the jackpot, you get $25,000 instantly. Game changer.
The Editor’s Verdict: Where is the Meta Drop?
If you are playing Ranked Resurgence, land at Research Center. It offers the best balance of loot density, cover, and rotation options without the pure RNG chaos of the Barn.
If you are playing Pubs/Solos, go for the Waterfall Cave. Getting a free Specialist bonus five minutes into the game is a win condition on its own.
Good luck, and watch those rooftops.
Recommended Watch: For a visual breakdown on how to hold these power positions and win your 1v1s, check out this guide on … How to win MORE GAMES on Haven’s Hollow.

About the author